Tuesday, August 30, 2011

Discovery box.

This is something I started doing a little while ago, and it's now become somewhat of a daily ritual. I filled an empty plastic storage bin with random things from around the house and left it in it's spot on the shelf. Cups, straws, magnets, paper, wooden sticks, toys, anything small enough to fit.
When he goes down for a nap, I trade everything with totally different items than the day before. Now he's getting up and immediately off to find and explore it. I love the look of surprise when he realizes it's all new. To him anyways. :)
I love the idea of open-ended playing with no real purpose other than exploring. He gets to do what he wants with all of it. It's amazing the things his little mind comes up with. Like this tower he's building.

Saturday, August 27, 2011

Indoor/outdoor magnetic chalkboard table.

 I bought a can of magnetic chalkboard paint, and painted two coats onto an old coffee table that we have been storing. It seems fairly waterproof and goes on really thick.
It's proving very popular with my little guy and others when they come over to play. It's the perfect height for standing at to draw and scribble on. Standing up to draw and play seems more comfortable and natural for little ones rather than sitting at a desk or table.
Since it's so jet black, it creates a really cool effect when you throw some colored sand onto it. Almost like a reverse light table. And because it's magnetic, i'm going to have to buy some fun magnets to add to it.
Only spent maybe ten bucks, and I have a feeling this is going to get a TON of use!


Wednesday, August 24, 2011

Dinner time sensory bin.

 Since he seems to love messes and any sort of texture, I threw together some quick fun for while I was cooking our dinner. I took an empty plastic storage bin, and added several different types of dry uncooked pasta, beans, and rice. I threw in some square glass beads just to make it a little more interesting. I've done this once before, using a much larger bin, and I dyed the rice with food coloring by just mixing it and letting it dry, added glitter and toy gold coins, and lots of other little things I could find around the house. He could care less since it all feels the same. :) I gave him some measuring cups and plastic spoons and bowls, and he was happily occupied for almost an hour. Long enough for me to cook! Since it's not for eating, I can store it for tons of use. He loves playing in it, scooping and pouring and digging his toes in it. I think picking up the tiny pieces of rice might be great for his hand-eye coordination, and lucky for me it's an easy cleanup.


Tuesday, August 23, 2011

Shaving cream marbling.

 Easy easy, but messy messy!
All you have to do is drip a few drops of food coloring into a tray of shaving cream and swirl it around. We used red, blue, and brown. The resulting colors were pretty pastels. Depending on the effect you're trying to get, you could go for bright, "boyish" colors, or stick to one color at a time. It all works the same.
 Just lay a piece of white paper on top of the swirly pattern and push down gently. Then lift it off. This was all easy enough for Parker to do himself. Then I used another piece of paper folded over to scrape off the excess foam from the dipped paper. It feels like it will remove the pattern, but it actually seems to brighten it instead and obviously helps the picture dry faster.
 The results were pretty great considering what was used. We did this over and over again between playing around in it. He loved the feel. The papers were left to dry and then I cut zillions of star shapes to make some decorations with. I punched a hole in the top of each one and threaded some ribbon through them so that they'd hang without glue.
The paper is great for cards, decorations, wrapping paper, framed, or anything else you can think to use it for. :)

Sunday, August 21, 2011

Salt dough!

 Probably one of my least expensive and favorite (though a little messy) activities i've done with this little guy.
The recipe:
3 cups of flour
1 cup of salt
1 cup of water
Large bowl
Cutting board and rolling pin (or hands)
Mix all the ingredients together in the bowl until it is a smoothish dough. Knead until it's a moldable ball of dough. Roll or flatten it out and then just mold or cut it into any shape or size. After that, just bake it in the oven at 300 degrees for about two hours or until rock solid. It comes out just like hardened clay would, just safer for baby and less expensive. :)
We've done quite a few hand and footprints. I always make sure to poke a hole with a straw before baking so that i have a place to hang them from. You can leave them plain like this, add food coloring to the dough before baking, or just paint after they've cooled.
 
 We've already sent out some to family, and i'm loving the idea. We'll definitely be making some holiday ornaments and things like that when the time comes.
Made this for a friends new baby boy. Tedious, but it came out cute. :)

Friday, August 19, 2011

Paper magic.

 This was one of our more simple and easy activities. All we needed were lots of colorful pieces of paper, a plain white sheet of paper, glue, and baby. I do make my own glue, just so that it's safe incase he decides to take a bite.
My recipe for that:
Mix 1 cup of flour, 1/3 cup of sugar, 1 1/2 cups of water, (you might need a little more or less, you'll be able to tell) and 1 teaspoon of vinegar. Warm it all up on the stove until it thickens a little, let it cool and it's ready to use. It stays in the fridge well for weeks.
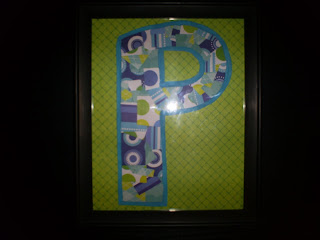
So I just took a plain white sheet of paper and covered it with a thin layer of the glue, and let him go to town putting on the little squares. Once he had the paper covered, (I had to fill a few gaps) I cut out a big "P" for his name, glued it to a colorful piece of paper and stuck it in a frame. Wa-La.
He had so much fun!

Thursday, August 18, 2011


 We made some homemade finger paint again today, and had a blast with our little group. Next time I'll be sure to get pictures of the action! It's totally edible (though not that yummy), and completely non-toxic, but the best part is that it's so easy to make and will last.
This is the recipe I use:
* 2 cups of flour (or corn starch)
* 1 cup of cold water
* 4.5 cups of boiling water
* Liquid food coloring
Mix the flour with the cold water and stir together. Pour in the boiling water and stir between each cup. It gets a little strange and gross (you are basically mixing a hot goop), but after stirring it literally seems to "melt" into a smooth custard-like consistency. I separate it into individual jars or cups, you can do it however you like, and then add color.
Overall verdict? Very easy, safe, and messy fun. Every little one that's played in it seems to love the texture. Paint brushes seem silly, since they almost always use their fingers anyways, but I mix the color in with them, then just leave them just incase. The paint is thick and gel-like, so it takes a long time to dry, but when it does it makes a great, almost 3-D effect on the paper. Give it a shot!